
Claude Code Tips: Everyday Commands from Plan Mode to Plugins
Contents
One photographer's website can tie together a useful set of Claude Code commands and shortcuts. Start by creating a project folder. On Windows, open it, type CMD in the address bar and launch claude from the command prompt. Accept the folder's trust prompt when it appears, then ask, “Build a personal website for a photographer.”
Start with a Project: Plan Mode and Permissions
Use Plan mode to work through the proposal before implementation. Once there's a plan, decide whether to approve it, continue discussing it or allow the editing permissions you want for the work. The approval choices depend on your mode and version; entering a website request doesn't by itself mean every session automatically switches into Plan mode.
Opening the result on Windows can involve another permission request, this time for start. Where the prompt offers a session-level allowance for that command, you can choose it instead of approving the same command each time. After implementation, have it open the page for a preview, then return to CMD.
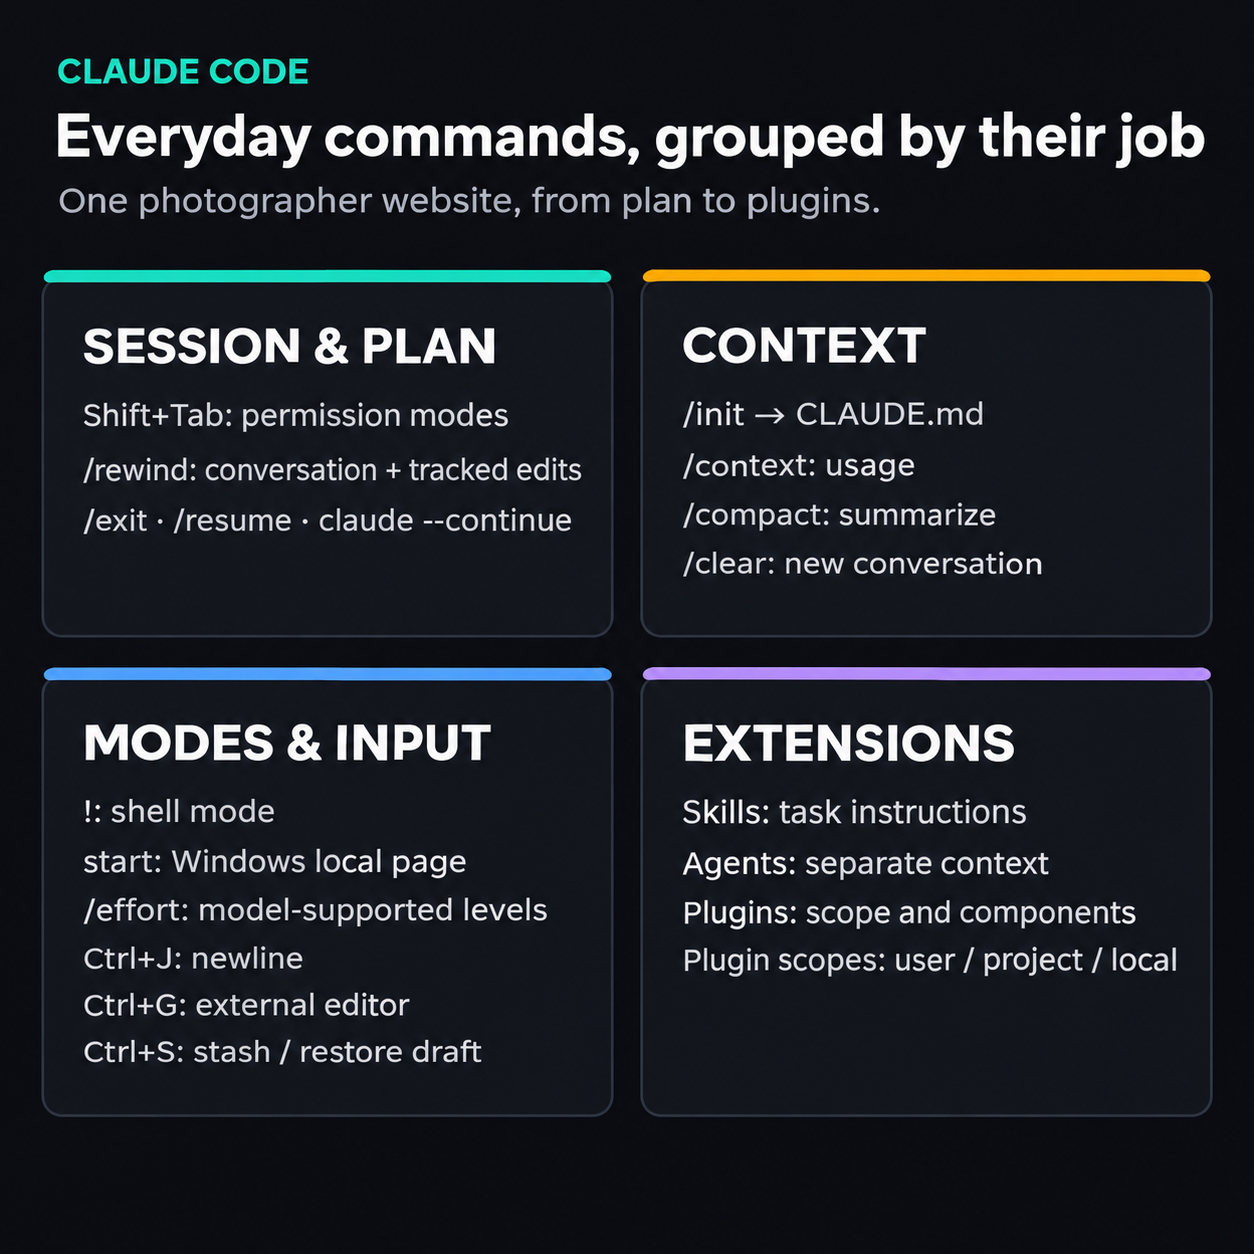
The project connects planning, rewind, context and extensions; available shortcuts and modes depend on the setup.
View full-size illustration
Rewind: What Can /rewind Take Back?
When the page goes wrong and each change makes it worse, use /rewind, or press Esc twice with an empty prompt. Choose the earlier point you want, then choose a menu action:
- Code and conversation together.
- Code or conversation separately.
- A summary of a selected part of the conversation.
For this website, choose the first useful checkpoint and restore both. File recovery starts with changes tracked by Claude's file-editing tools; later Bash changes to those same tracked files can also be undone. Files changed only through Bash aren't tracked. External service changes and Git state need separate handling.
Enter Plan Mode Yourself: Shift+Tab and Clarifying Questions
You can choose Plan mode before handing over the job. Shift+Tab cycles permission modes, including default, acceptEdits and plan, with other modes available in supported setups; some Windows terminal/runtime combinations use Alt+M. Send the photographer brief in Plan mode and work through the project details. Where Claude offers choices, move through them with the arrow keys and submit your answers. It can revise the plan around that feedback. When the plan fits, approve implementation with the editing permissions you intend, then preview the resulting page.
Shell Mode, Reasoning Effort and Longer Prompts
Start a prompt with ! to use shell mode. On Windows, start followed by the local index filename can open the page.
If a plain HTML, CSS and JavaScript site has become hard to maintain, ask for a refactor using a more modern stack. For that larger job, /effort lets you choose from the levels your model and organization settings support; max is the highest where it's available.
For a longer request, the input shortcuts have different jobs:
Ctrl+Jinserts a newline.Ctrl+Gopens an external editor. Save using that editor's controls and close it to bring the text back.- In Claude's composer,
Ctrl+Sstashes or restores a draft.
Implementation may bring more permission requests. Launching with approvals bypassed can remove those interruptions, but it's dangerous on a machine with your real files.
Exit, Resume and Project Instructions: /init and CLAUDE.md
Use /exit when you need to leave, then run claude again from the project directory when you return. To bring back a conversation, use /resume and select it, or start with claude --continue to resume the most recent session in that directory.
Run /init to create a starting CLAUDE.md for project instructions such as the stack and working rules. Reference it with @ and ask it to record a useful rule for the photographer's site: “Preserve the existing image filenames when changing the layout.” The next layout request then has an explicit project constraint to follow. CLAUDE.md supplies context according to its scope and loading rules; it isn't a hard permission lock or a complete archive of every previous conversation.
Context: /context, /compact and /clear
Use /context to see how the context window is being used, including the share taken by different kinds of content. A reading such as 13% belongs to that particular session. If a long conversation has become unwieldy, /compact compresses it; /clear starts a fresh conversation when you want to put the old exchange aside. Run /context again to see the difference. Clearing the conversation leaves project files and applicable instructions in place, so CLAUDE.md can still give the new conversation a starting understanding of the project.
Skills: Instructions You Can Call by Name
A skill is a set of instructions for a particular job. Personal skills go in ~/.claude/skills/<name>/SKILL.md; project skills go in .claude/skills/<name>/SKILL.md. For a “daily report” skill, create its folder and ask Claude to build the instructions. The Markdown file can contain a name and description in its frontmatter, followed by the instructions in the body. Find it among the available skills, then ask for a daily report using it. Discovery makes the skill available to call; it doesn't promise that every request will trigger it automatically.
Agents: A Worker with Its Own Context
A subagent works in a separate context and returns a result to the main conversation. It can keep a detailed side job out of the main working history, although its requests still use tokens and its returned result still occupies context. Create its definition at project scope or user scope, depending on where you want it available.
For this project, create a project-level code-review agent. Use Claude to generate the definition, or configure it manually. Ask for a code reviewer, then give it the specific read tools it needs for a read-only review. Choose its model and, where offered, a display color.
Persistent memory has three scopes:
project: project-specific knowledge that can be shared through version control.user: knowledge across your projects.local: project-specific memory intended to stay out of version control.
You can also leave persistent memory unconfigured. For the project reviewer, choose project if you want that shared knowledge; what teammates receive depends on what is actually committed. Review the generated instructions, edit them if needed and save the definition. Then ask Claude to call the reviewer on the website's code and return its findings.
Plugins: Package Skills, Agents, MCP and Hooks
A plugin can bundle skills, agents, MCP servers and hooks; each plugin needn't include all four. For this website, open the plugin browser and find frontend-design under Discover. Choose the installation scope:
userenables it across your projects on that machine.projectrecords it for the repository.localenables it only for you in that repository.
Choose project for this installation. A committed project declaration can enable the plugin for teammates, but they still need the plugin installed.
To try the design workflow on a fresh page, create another folder and install the plugin at project scope there too. Open CMD and claude, and request a photographer's personal website using frontend-design. Open the result and refine the details.