Four Commands, Three Layers — How OpenSpec Works Behind the Scenes
Contents
Add an OpenSpec planning step to a coding request, and your assistant can draft requirements, a technical approach, and an implementation checklist before it changes the code. Review those documents, correct the assumptions, then start development. That gives you a place to catch misunderstandings early. Here is how that OpenSpec workflow works, from the commands you invoke to the files and configuration underneath.
1. You Still Need to Say What You Mean
Vibe coding asks you to communicate what you want. A vague request leaves the model to make decisions you may have intended to make yourself. Clear logic and clear expression help.
Then come the software-engineering abbreviations. SDD, TDD, BDD, DDD. It is a lot of DD to meet at once. Two are especially useful here. Spec-driven development makes intended behavior explicit before implementation. Test-driven development starts with a failing test for the next behavior, adds the code to pass it, then refactors. You can use them together, including with a separate workflow tool such as Superpowers when it fits your setup.
Frameworks package these practices in different ways. OpenSpec combines instructions for your assistant, a command-line program, and configurable document structures. Understanding those parts makes it easier to see what a command actually does.
2. Three Useful Design Choices
First, OpenSpec organizes planning into reviewable documents. A proposal captures the reason and scope, specifications describe behavior, a design records the technical approach, and tasks break down implementation.
Second, the document workflow is configurable. A custom schema can change which documents you produce and how they depend on one another.
Third, it separates the current specifications from the record of changes. One set describes the synced requirements. Another preserves what was proposed and changed along the way.
3. Four Commands to Follow Through a Change
For an npm-based setup, the version checked here is OpenSpec 1.16.1, requiring Node.js 22.12.0 or newer. Run npm install -g @fission-ai/openspec@1.16.1 in a terminal, then openspec --version. From the project root, run openspec init and select the assistant you use. You can do this in a new or existing project. Initialization writes the project structure and the appropriate integration files. If you ask an assistant to handle setup, check its reported source, version, and generated files too.
We will follow four chat operations. OpenSpec's current core set also includes update and sync. Expanded workflows are selectable through openspec config profile, followed by openspec update in the project. The examples below use Claude Code's /opsx: spelling in chat. Follow the generated setup hint for another assistant. For example, Cursor uses /opsx-propose, while Codex invokes the generated skills.
Start with /opsx:explore when the idea needs discussion. Imagine asking for a basic AI chat assistant that accepts a question and displays a reply. Useful questions include the frontend, the model service you can access, and whether a lightweight backend fits. Then settle whether conversations need history and whether replies should stream as they arrive.
You can begin with a rough idea and use the exchange to work through it. Explore helps investigate and compare options. You decide which requirements to keep and when to move into planning documents.
Next, /opsx:propose build-chat-assistant creates a change folder and drafts the artifacts required by the selected schema. In the standard spec-driven workflow, those include the following.
proposal.mdexplains why the change matters, its scope, and the affected capabilities.specs/<capability>/spec.mddescribes observable behavior, inputs, outputs, constraints, and scenarios.design.mdrecords implementation choices such as the frontend and backend frameworks, model API, and request handling.tasks.mdprovides the implementation checklist.
For a scenario, describe what should happen when a user sends a question and what they should see in response. That gives you behavior to check. Model parameters and framework choices belong in the design. Review each document for the decisions you need to make.
Project settings in openspec/config.yaml can supply background through context, select a default schema, and add artifact-specific rules. You could set a rule asking for a proposal under 500 characters if that suits your project. The limit is your choice. These settings guide the assistant's writing.
Then invoke /opsx:apply build-chat-assistant. The assistant reads the relevant documents and works through the tasks using its available development tools. Check the behavior you specified, including sending a question, receiving a reply, and handling errors. If you included streaming or history, check those too. Compare the reported tests and the actual result with the requirements before closing the change.
4. Archiving Has Two Jobs
After checking the implementation, invoke /opsx:archive build-chat-assistant in Claude Code. It checks the change's completion state and can offer to sync specification updates before archiving. Read the reported sync result alongside your project's actual check results as you close the change.
The archive record lives under openspec/changes/archive/YYYY-MM-DD-<change-name>. It keeps the documents associated with that change.
Specification sync updates the main files under openspec/specs. For example, a new capability adds a specification. A new scenario for an existing capability belongs with that capability. Changed behavior requires replacing the affected requirement with its revised form. OpenSpec's delta format also supports removals and renames. You can invoke sync separately, and the chat archive workflow can offer to sync when needed.
That gives you two ways to look at the project. Read archived changes for the history, and main specifications for the synced intended behavior. Compare that behavior with the implementation when correctness matters. Documents and code can drift, and the archive result tells you whether sync actually happened.
5. Underneath Are Three Layers
At first glance, OpenSpec may look like a collection of skills and command files. Those files organize the assistant's workflow and tell it how to use the CLI. The CLI reads configuration, schema information, and change state to return structured guidance. The assistant uses that guidance to write the documents.
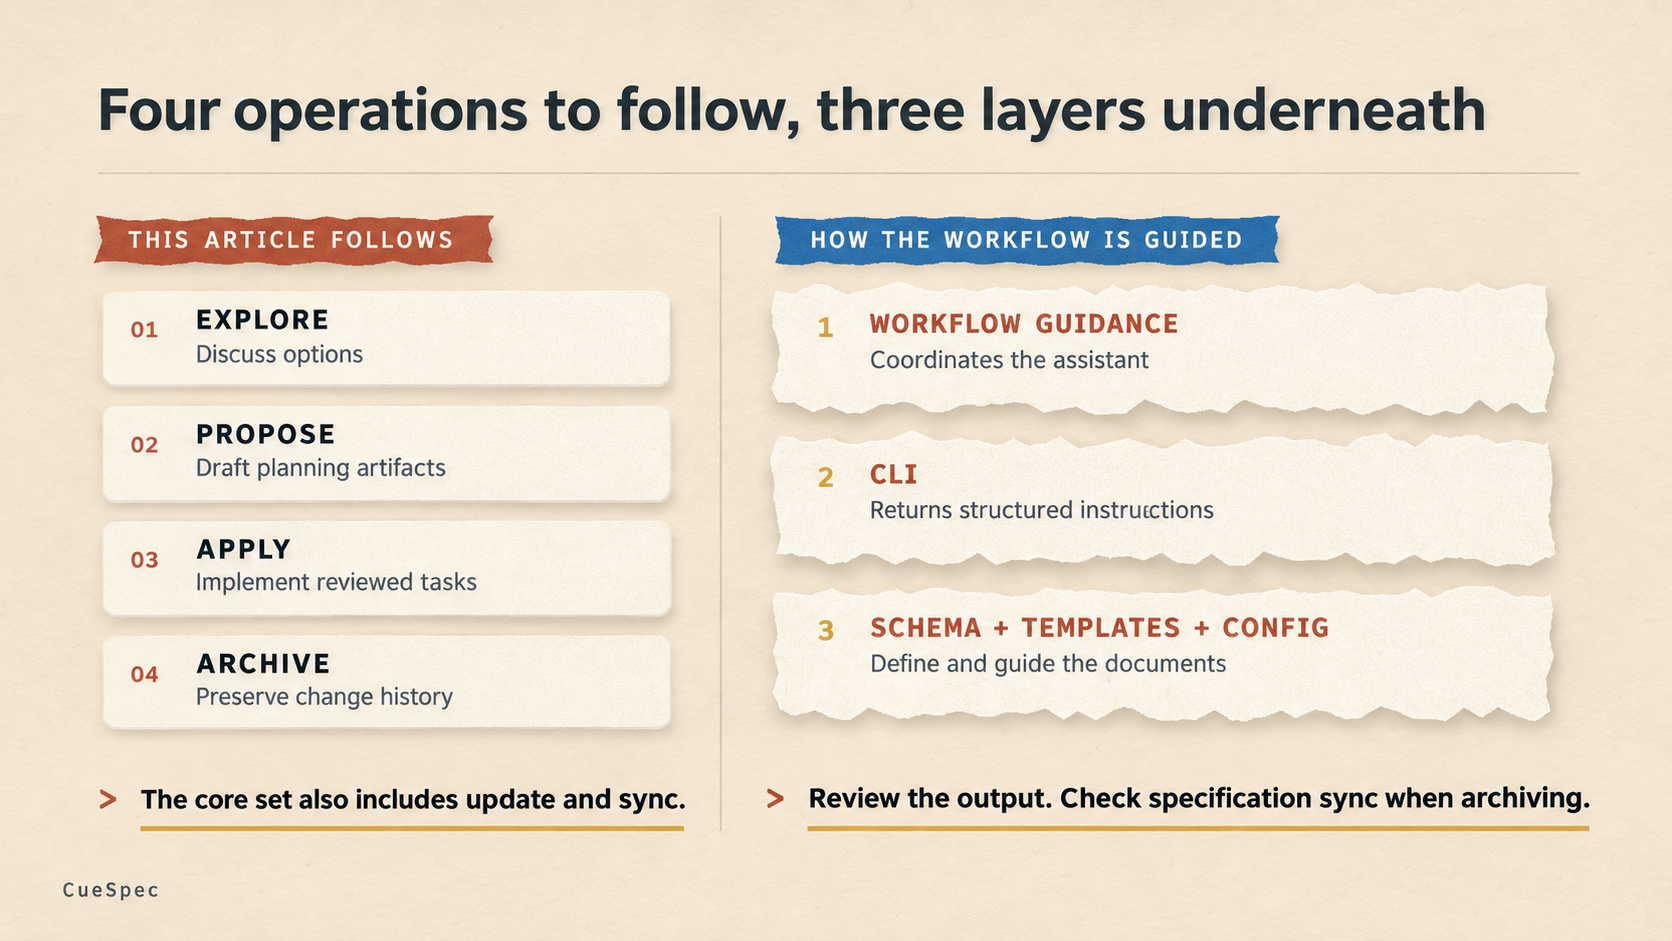
The four operations followed here use workflow guidance, CLI responses, and schemas with templates and project configuration. Check whether specification sync happened when archiving.
View full-size illustration
The schema is an important part of that arrangement. Its artifacts list defines the document types and their IDs. Three fields explain much of the behavior.
templateidentifies the document template, normally found under the schema'stemplatesdirectory.instructiongives guidance for writing that artifact.requiresidentifies the artifacts it depends on.
In the current default schema, the proposal comes first. Specifications and design both depend on the proposal. Tasks depend on both specifications and design. That is a dependency graph. It tells the workflow what is ready to produce, while the assistant still has to read and write the actual content.
Follow propose through those layers.
- The assistant creates a named change folder.
- It requests the change's status and artifact order from the CLI.
- For an artifact that is ready, it requests instructions that bring together the schema, template, project context, and relevant rules.
- It reads the dependencies, writes the artifact, and continues until the planning needed for apply is ready.
You can inspect those structured responses with commands such as openspec status --change build-chat-assistant --json and openspec instructions design --change build-chat-assistant --json.
The workflow instructions coordinate the steps. The CLI supplies structured information. Schema, templates, and project configuration define and guide the document system. Keeping those roles in view helps when you want to change the workflow.
6. Build Your Own Document System, With Its Tradeoffs
The default schema is a useful starting point. When you need a different one, run openspec schema fork spec-driven my-workflow. That creates a project-local copy under openspec/schemas/my-workflow. Edit its schema.yaml and files under templates, then set the project's schema in openspec/config.yaml to my-workflow.
The harder part is deciding what your documents should contain. Keep the dependencies valid and validate the schema as you change it. Removing the specs artifact, for instance, removes the delta-spec input used for specification sync. You can still preserve other artifacts in the archive, but you have changed how the workflow maintains its requirements.
7. Back to Spec-Driven Development
The purpose is to agree on behavior early enough to guide development. Extra planning has a cost, so compare it with the ambiguity and rework in the task you are tackling. A smarter model still has to work from the intent you make available to it. Mind reading remains outside the setup instructions.
Read the documents that contain your decisions. Check whether the requirements express what you meant, whether the design fits, and whether the tasks cover the work. Those files give both you and the assistant something concrete to return to as implementation changes your understanding.