Four Steps to Tackle Low Mic Volume and Background Noise on Windows
Contents
You buy a new microphone, but people in voice chat still can't hear you. Every tutorial seems to say “turn up the system volume,” which is already at the top. You're barely above a whisper. Software gain gives you a usable level, only for you to sound quiet in some games. Push harder and up comes the hiss. Add noise reduction and your voice turns muddy, or bits of it disappear. Neither option feels right.
If that's your problem, one route is to process the mic in OBS, then send that signal to the game or call through a virtual cable. Keeping gain, filtering and noise profiling in one host makes the path easier to follow. Each receiving application can still apply its own gain or processing.
The four steps are routing, gain, noise reduction and a noise sample. This reference setup uses Windows 10 or 11 x64, OBS Studio x64, ReaPlugs 2.36 x64's VST2 ReaFIR and VB-CABLE Pack45. The route follows the projects' documentation; it still needs a microphone test on your machine. Keep OBS running while you use it.
Step 1: Put the Mic on One Route through OBS
Install VB-CABLE using VB-Audio's instructions. Its names describe opposite ends of the cable: CABLE Input is a playback device that receives audio; CABLE Output is the recording device from which another app receives it.
In OBS, add an Audio Input Capture source and select the physical microphone. Speak and check that this source's meter moves. Use this one capture of the mic; disable any duplicate Mic/Aux capture and turn off the old Windows Listen to this device route if it is enabled.
In Settings → Audio, choose CABLE Input as the monitoring device. Enable monitoring for the microphone source. The Audio Mixer Guide describes a Monitor button; versions with an Audio Monitoring menu in Advanced Audio Properties offer Monitor Only (mute output) for sending it to the monitoring device while keeping it out of the stream or recording mix. In the game or call, select CABLE Output as the microphone. Check that app's input meter as you speak.
Keep the call's playback going to your headphones, not back into CABLE Input. Don't recapture CABLE Output or monitor desktop/call audio into the same cable. If this cable already serves a different audio route, use a separate virtual cable for this path. You want one trip from mic to OBS to cable to the receiving app, not a loop.
Step 2: Raise the Level in the Same OBS Source
First check the mic or audio interface's own gain and placement. Adding software gain to a noisy or distorted input won't recover a clean recording.
Open the microphone source's Filters, add a Gain audio filter and raise it gradually. Keep the mixer fader at a known setting while making the adjustment. Watch for clipping, then use the receiving app's mic-test or playback feature to hear what arrives. There is no single dB setting that fits every microphone. If the voice becomes louder but the hiss rises with it, add the next filter.
Step 3: Reduce Noise with ReaFIR
Install the x64 ReaPlugs package and make its VST2 DLL available in an OBS scan location, such as C:/Program Files/Common Files/VST2/. On the same microphone source, add a VST 2.x Plugin filter, choose ReaFIR and open its interface. The 64-bit host needs the 64-bit plugin; a VST3 file isn't a substitute for this filter. If ReaFIR isn't listed, check its bitness and installed DLL location before continuing.
Choose Subtract mode and place ReaFIR before Gain in the source's filter order. The curve controls what is subtracted from the signal. Make a small adjustment and listen through the receiving app. Listen for both less hiss and a voice that remains intact; stronger subtraction can also dull or break speech. The next step gives that curve a sample of the actual background noise.
Step 4: Build the Noise Profile in ReaFIR
For voiceover or a noisier room, build the profile in the same ReaFIR instance already processing the mic. Keep the microphone in its working position and leave the background sound you want to reduce present.
In ReaFIR's Subtract mode, enable Automatically build noise profile. Stay silent while it learns the background, then turn that option off before speaking again. Leaving it on during speech teaches it part of the voice you want to keep.
The profile is already in the active OBS filter. Save the OBS setup, speak again and check the receiving app's meter and playback. Adjust ReaFIR and Gain together until the level and voice quality are useful. Everything stays in this host; no plugin state has to be copied between applications.
If the call or game has automatic gain control or its own noise reduction, account for those when judging the result. More processing can change the voice again. Compare settings one at a time so you know which stage is helping.
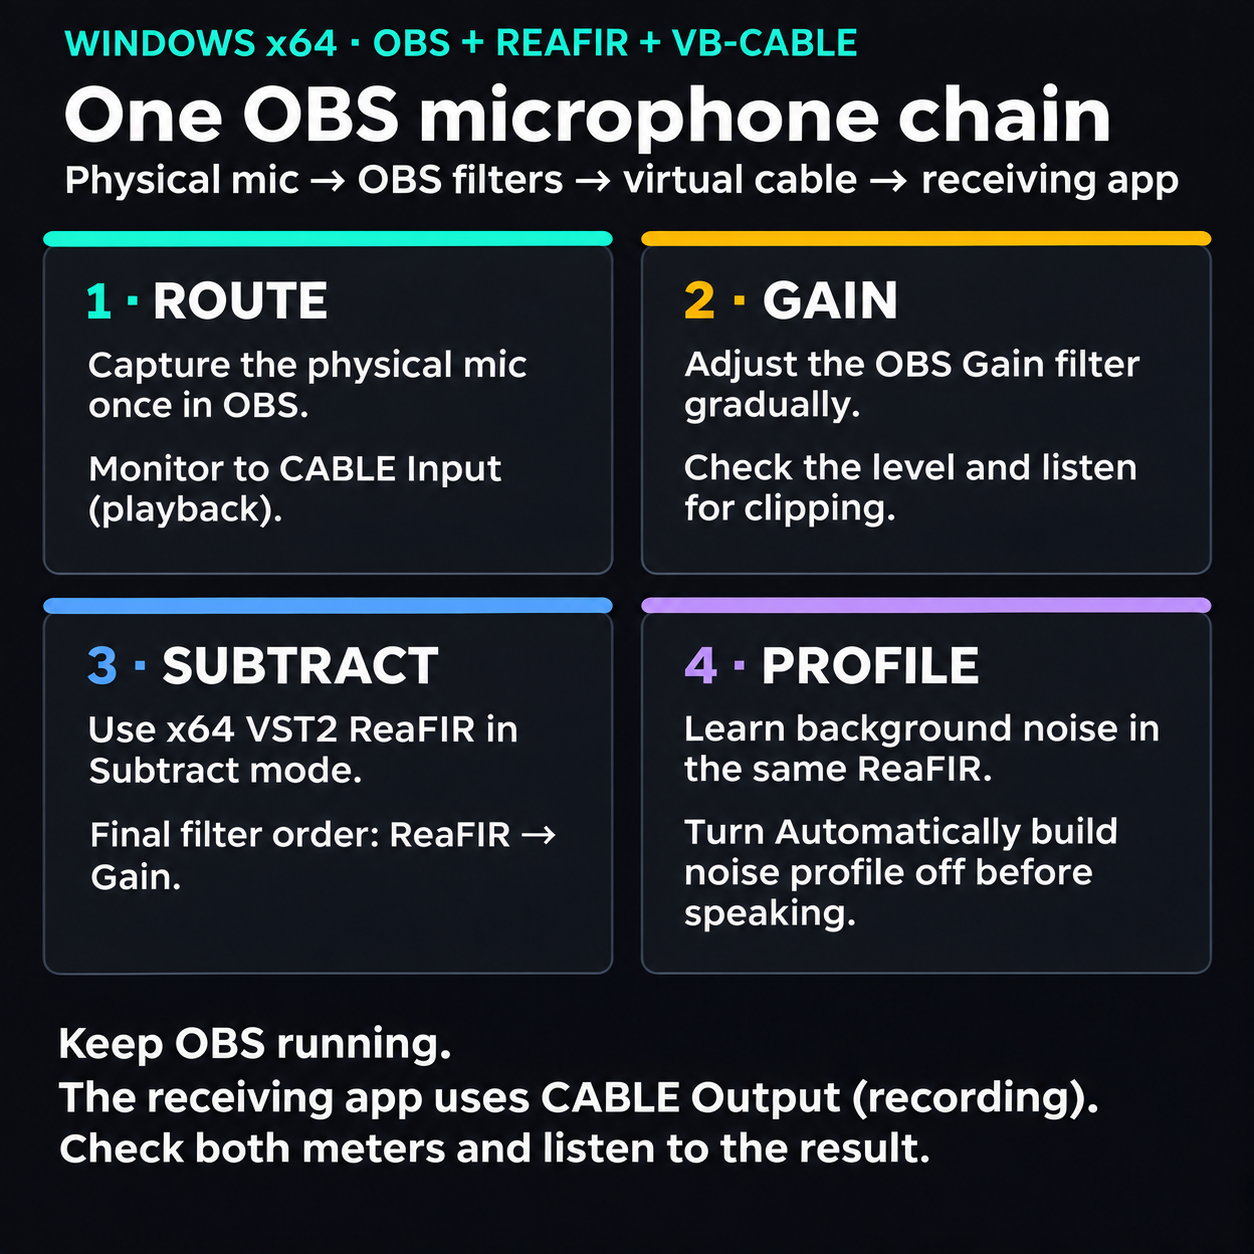
A documentation-based OBS routing setup: CABLE Input is the playback destination and CABLE Output is the receiving app's recording device. Keep OBS running, avoid duplicate routes and test the signal on your machine.
View full-size illustration
How to Compare the Difference
Compare four versions using the same mic position and passage: gain with no noise reduction; the ReaFIR-based chain; a different noise-reduction filter by itself; and the chain followed by that additional filter. Use your own recordings or the receiving app's playback test to compare them.
The comparison is about two things at once: how much background sound remains and how much of the voice survives the processing. That's the trade-off to listen for when the microphone already has a noisy signal.